In this post, I will show how to install Yosys open source synthesizer and how to use basic
commands. Also I will synthesize N-bit counter that I have written in the first post of this series.
Yosys works on Linux environment. If you are a Windows user and want to use Yosys, you need
Cygwin to emulate Linux commands. In Yosys github repo, readme file tells how to build Yosys.
But, I will suggest to use one of the common Linux distros. Linux, as you all know is a open source
platform. Most of the open-source projects run under Linux and do not support Windows. It is also
a philosophy not to use Windows for most open-source community people. Also, maybe for Yosys
working under Windows seems OK, but in one day you will encounter a situation where you need
to work with Linux.
By the way there are a lot of different Linux distros. I am using Ubuntu 20.04. So it is not
guaranteed that a project is working in my environment has to work at yours too. Even if you also
use Ubuntu 20.04, gcc and Pyhthon version differences also affect running programs successfully or
not. If you are happy with your Windows for lots of application and want to use Linux aside
Windows, you can use dual-boot option. Just give some space for Ubuntu and install Ubuntu
without touching and disturbing Windows side. Below is a good link showing how to install Ubuntu
alongside Windows:
https://itsfoss.com/install-ubuntu-1404-dual-boot-mode-windows-8-81-uefi/
You can have issues during installation such as not seeing your hard drive etc. I had all issues
possible :), even partition problems. Just google the problem and you will eventually solve the
problem and install Ubuntu. By the way, Ubuntu announced a new LTS (long-term-support) Jammy
Jellyfish, 22.04, you can also install it, but 20.04 will be supported to 2025, no problem. You can
read the article below to learn about Jammy Jellyfish:
https://ubuntu.com/blog/ubuntu-22-04-lts-whats-new-linux-desktop
OK, from now on I will assume we are working on Ubuntu 20.04. Yosys can be downloaded from
its github repo. It has releases. Another option is cloning the repo and always sync with the master
branch. I will simply download the latest stable release, which is at this time (2022-05-25) 0.17
version. I downloaded tar.gz file:
https://github.com/YosysHQ/yosys/releases

I extracted the archive file to Desktop. I opened the root folder with VS Code:

I run command below as suggested in Yosys readme file:
$ sudo apt-get install build-essential clang bison flex \
libreadline-dev gawk tcl-dev libffi-dev git \
graphviz xdot pkg-config python3 libboost-system-dev \
libboost-python-dev libboost-filesystem-dev zlib1g-dev
After that, I did not change any options in the makefile and just run ‘make’
It took nearly 20-30 minutes to finish the build. After the installation you can write ‘./yosys’ in the
console to start the Yosys. The output is like:

You can use ‘Ctrl+C’ to exit from Yosys console.
Yosys internal working architecture is shown below:

Yosys first read a verilog file and convert it to RTLIL (Register Transfer Language Intermediate
Language) format, which is the so-called frontend. Then pass operations are handled, which are
either transform RTLIL data by performing optimizations or analyze it by evaluating a logic net
with a given input. In the backend stage, after these passed a verilog netlist file is created and output to a file.
By the way, the first Yosys paper is dated back to 2013. So be careful on the documents, possibly a
lot feature update happened. Yosys Open Synthesis Suite presentation is dated to March 2022 and a good explanatory document. Yosys manual document has also detailed explanations about both
using Yosys and developing with source code in C++. It is out of my desire, time and scope to go
into every details of how Yosys works. Therefore, in this post I will show how our N-bit counter
verilog is synthesized to FPGA and ASIC with Yosys.
When you build Yosys, it comes with a directory named “techlibs”. Inside this folder, you can find
different library files for different FPGA architectures and also a general purpose ASIC library
called “cells.lib”. In this post, I will synthesize the counter example for Xilinx FPGAs like the 2
posts before this one, but this time Yosys will be used.
The definition of basic cells for Xilinx FPGAs are found in /techlibs/xilinx/ directory and the files
are cells_sim.v and cells_xtra.v for to be used in synthesis. Some examples are VCC, GND, IBUF,
OBUF, BUFG, INV, LUT1, XORCY, MUXF9, CARRY8, FDRE, SRLC16E, ROM16X1,
MULT18X18, DSP48E1, RAMB36E1. In order Yosys to use these Xilinx library files, a simple
command is defined in Yosys called synth_xilinx. You can find information about synth_xilinx
command in source files such as techlibs/xilinx/synth_xilinx.cc or in the documentation webpage:
https://yosyshq.net/yosys/cmd_synth_xilinx.html
Some of the options for synth_xilinx command are:
-family <family>
run synthesis for the specified Xilinx architecture
generate the synthesis netlist for the specified family.
supported values:
- xcup: Ultrascale Plus
- xcu: Ultrascale
- xc7: Series 7 (default)
- xc6s: Spartan 6
- xc6v: Virtex 6
- xc5v: Virtex 5 (EXPERIMENTAL)
- xc4v: Virtex 4 (EXPERIMENTAL)
- xc3sda: Spartan 3A DSP (EXPERIMENTAL)
- xc3sa: Spartan 3A (EXPERIMENTAL)
- xc3se: Spartan 3E (EXPERIMENTAL)
- xc3s: Spartan 3 (EXPERIMENTAL)
- xc2vp: Virtex 2 Pro (EXPERIMENTAL)
- xc2v: Virtex 2 (EXPERIMENTAL)
- xcve: Virtex E, Spartan 2E (EXPERIMENTAL)
- xcv: Virtex, Spartan 2 (EXPERIMENTAL)

-ise
generate an output netlist suitable for ISE

-nobram
do not use block RAM cells in output netlist

-flatten
flatten design before synthesis
There is an example in the directory /examples/basys3/ aiming Digilent’s Basys3 board, in which
there is Artix7-35t FPGA. run_yosys.ys script is:
read_verilog example.v
synth_xilinx -edif example.edif -top example
I run this script by calling:
~/Desktop/yosys-yosys-0.17/yosys run_yosys.ysThe log for this script is outputted to console, for now I couldn’t find if this log is written to a file or
not.
Yosys first create RTLIL in front-end:
1. Executing Verilog-2005 frontend: example.v
Parsing Verilog input from `example.v' to AST representation.
Generating RTLIL representation for module `\example'.
Successfully finished Verilog frontend.
Then parse and generate RTLIL representation for cells from cells_sim.v and cells_xtra.v files.
After that a lot of “pass” operations such as PROC_INIT, PROC_MUX, PROC_DFF, SHARE etc.
are run during synthesis stage. Finally synthesis is completed by printing statistics and executing
EDIF back-end:
2.50. Printing statistics.
=== example ===
Number of wires: 12
Number of wire bits: 211
Number of public wires: 4
Number of public wire bits: 59
Number of memories: 0
Number of memory bits: 0
Number of processes: 0
Number of cells: 84
BUFG 1
CARRY4 7
FDRE 42
IBUF 1
INV 1
LUT5 16
OBUF 16
Estimated number of LCs: 16

2.52. Executing EDIF backend.
End of script. Logfile hash: f4f24c08bc, CPU: user 3.47s system 0.14s, MEM: 338.10 MB peak
Yosys 0.17 (git sha1 UNKNOWN, clang 10.0.0-4ubuntu1 -fPIC -Os)
Time spent: 56% 19x read_verilog (2 sec), 10% 12x opt_clean (0 sec), …
In the examples/basys3 directory, EDIF netlist file example.edif is generated:

Now it is time to use Yosys for out N-bit counter design.
I first created a directory named “yosys_workspace” and inside a “counter” directory. I copy
counter.v and create yosys_run.ys script which includes:
read_verilog counter.v
synth_xilinx -edif counter_netlist.edif -top counter
write_verilog counter_netlist.v
Then I run yosys_run.ys script by calling yosys binary.
The script generated 2 netlist files, first one is in EDIF format and second one is in Verilog format.
The log output shows logic cell utilization:
=== counter ===
Number of wires: 26
Number of wire bits: 50
Number of public wires: 6
Number of public wire bits: 12
Number of memories: 0
Number of memory bits: 0
Number of processes: 0
Number of cells: 27
BUFG 1
CARRY4 1
FDCE 4
IBUF 8
INV 5
LUT5 4
OBUF 4
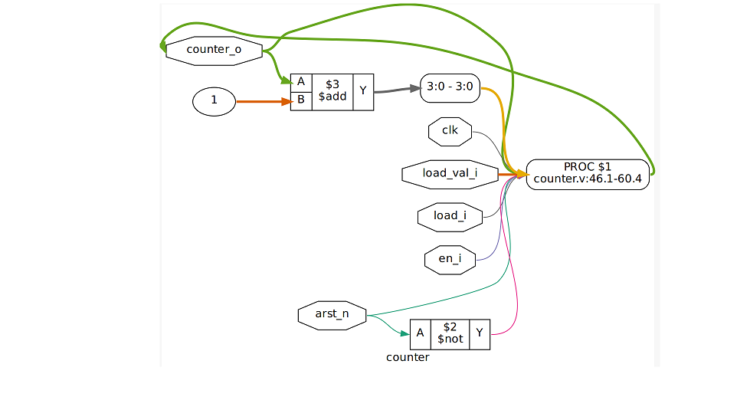
Estimated number of LCs: 4You can use Yosys “show” command to see a graphical view of Verilog files. To use show
command, first read a verilog file by read_verilog command and then just run “show”. You can use
-colors 2 to see connections in colored instead of bw. The graphical view of counter.v is below:

The graphical view of counter_netlist.v is below:

Of course the netlist view is too much complicated to understand by eyes even for a 4-bit counter
code. Let’s zoom-in:

So this simply concludes this post. I showed how to install Yosys open-source synthesis tool.
Showed where are the library files for ASIC and different FPGA architectures. Showed commands
and some scripts. Run a pre-defined example project running for a Xilinx FPGA. Then I
synthesized our simple counter module for Xilinx FPGAs.
Yosys has plentiful documents such as papers, slides and detailed documentation page. I give link to
them and strongly urge you to have a look at those. The information in this post is a summary from
those great documents. When you delve into Yosys, its source code and how it works, you
appreciate the amount of work that has been done. A great thank to its developers and maintainers is
well deserved!
https://yosyshq.net/yosys/documentation.html
In the next post, I plan to use cells.lib library file to aim for ASIC design and look for open-source
library files for different technology nodes to be used.
Regards,
Mehmet Burak AYKENAR
You can connect me via LinlkedIn: Just sent me an invitation